tcache bin 的引入
在2.26版本引入了tcache bin引入的一种内存管理机制,用于管理空闲的chunk。同时,tcache 引入了两个新的结构体,tcache_entry和tcache_perthread_struct,首先分析一下这两个结构体
tcache_entry
1 | struct tcache_entry { |
tcache_entry结构体用于链接空闲的chunk结构体,其中的next指针,指向下一个相同大小的chunk.通过next指针链接,tcache bin形成了单链表结构。其中next指针位于chunk的fd位置
tcache_perthread_struct
1 | struct tcache_perthread_struct { |
每个线程都会维护一个tcache_perthread_struct,用于管理整个tcache bin的结构
unsigned int counts[TCACHE_MAX_BINS] 用于存放每个bins中存放的空闲块的数量
struct tcache_entry *entries[] 用于存放每个bin的第一个chunk地址
其中TCACHE_MAX_BINS规定可以管理的不同大小的bin块的数量,bin块大小以此类推,从而间接决定了tcache bin可以管理的最大bin块的大小。
tcache bin的key加密机制
在libc2.29的版本后,tcache bin引入了tcache的key加密机制,tcache_entry中新加了一个指针key,
1 | struct tcache_entry { |
分析一下空闲的chunk进入tcache bin的过程
1 | tcache_put (mchunkptr chunk, size_t tc_idx) |
tcache_put首先把得到的chunk指针转化为tcache_entry类型,这里chunk2mem是返回我们chunk的mem区域,mem区域是指用户可用的区域即user data。
tcache_key传入到e->key的位置,标记这个chunk已经被释放,避免发生双重释放的问题。
1 | void initialize_tcache_key() { |
key存储在fd之后的内存区域中。
即为2.29 tcache bin防止双重释放的方法。
1 | e->next = PROTECT_PTR (&e->next, tcache->entries[tc_idx]); |
将当前内存块插入到了链表的最前面
2.32版本引入了safe-linking机制
其中PROTECT_PTR涉及到了对进入next指针的加密操作。
1 |
计算方法是当前释放的chunk的next值是由我们释放的chunk的指针右移12位,然后再与上一个chunk的指针异或得到的。
demo
这里我写了一个简单的demo来演示这个过程
1 |
|
使用的是 2.35-0ubuntu3.8版本的libc,
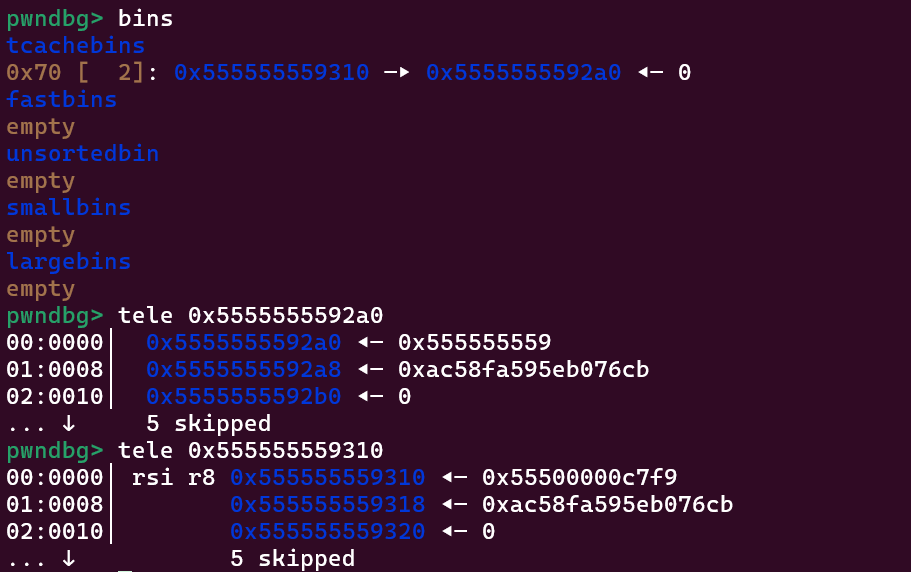
程序首先申请两个相同大小的堆块,然后输出num,和chunk b的地址,然后free掉a和b,

可以看到0x555555559310里面是经过异或和移位的next指针,是通过
(0x555555559310>>12)^(0x5555555592a0)
然后给一次向chunk b中读入数据的机会,读入已经经过加密后的num指针,

成功把num放入tcache bin,然后把num申请出来,然后通过往dchunk中写值的方式,改变num中的值

达成了在tcache key的影响下,任意地址写。
攻击脚本:
1 | from tools import* |